Take on the roles of pilot and copilot as you and your partner work in tandem to pop the flaps, deploy the landing gear, and clear the runway for a smooth and safe landing. Every round, you’ll each place your four dice on the board one at a time to address your most pressing needs—but here’s the twist: you and your copilot can only discuss strategy in between rounds! Collaborate silently and anticipate each other’s actions to cruise to a safe landing and win the game!
What Is Sky Team?
Sky Team is a cooperative, limited communication, dice placement game, from the team that brought you the GeekDad Approved Turing Machine, for 2 players only, which takes about 20-30 minutes per scenario. The game itself retails for a steal at $29.99 and is available for purchase at your local game store and online via Hachette Board Games’ website. Sky Team utilizes pretty straightforward iconography for the board making this game mostly language-independent, and while the concepts and the beginning scenario can easily be tackled by players less than the suggested 14+ age range, once the game begins to add complexity, that age range starts to make more sense. With several extra scenarios and modular setups included in the box, this game has a surprising amount of replayability, especially at such a reasonable price point.
Sky Team was designed by Luc Rémond, with art from Eric Hibbeler and Adrien Rives, and was published by Le Scorpion Masqué.
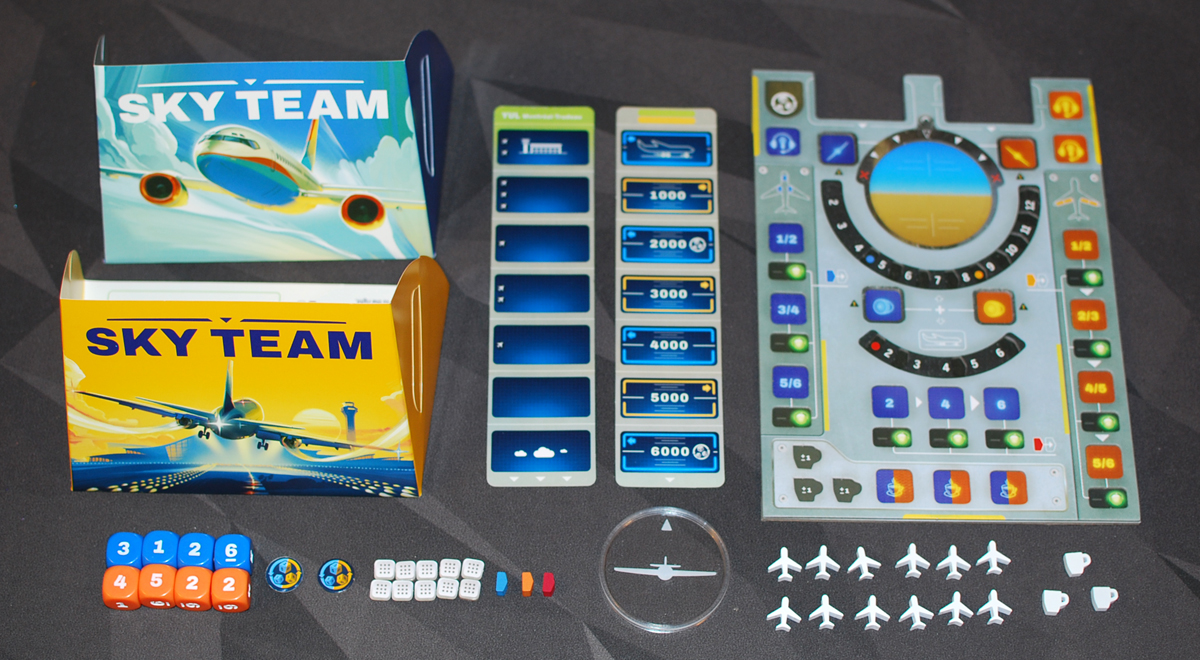
Sky Team Components
- 4 Blue Pilot Dice
- 4 Orange Copilot Dice
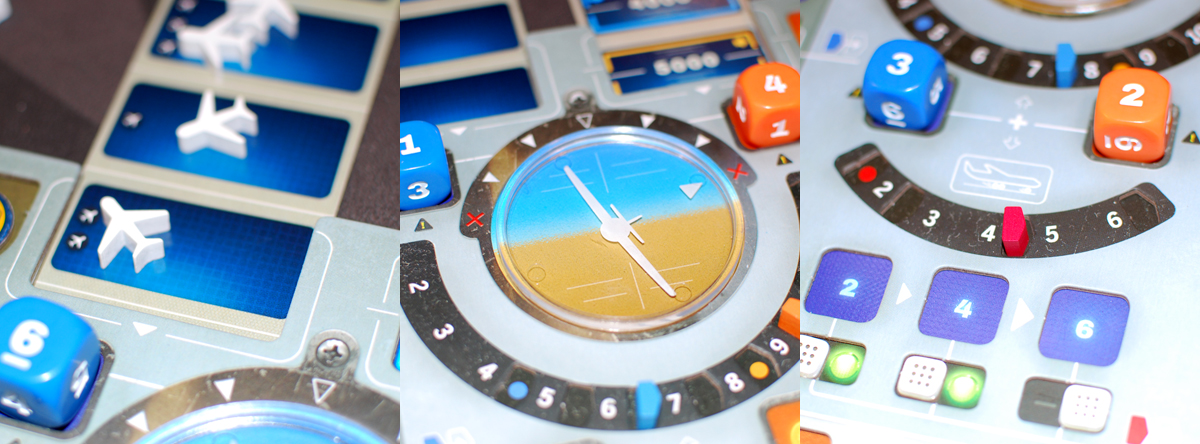
- 1 Control Panel
- 1 Airplane Axis Disc
- 2 Player Aid Screens
- 3 Wooden Marker Tokens (Orange for flaps, Blue for landing gear, Red for brakes)
- 2 Re-roll Tokens
- 3 Wooden Coffee Mug Concentration Tokens
- 12 Wooden Airplane Tokens
- 10 Switches
- 1 Altitude Track
- 1 Approach Track (YUL Montréal-Trudeau Airport)
- 1 Landing Procedure Rulebook
- 1 Flight Log Booklet (contains extra rules for new scenarios and modular setups)
- 20 Additional Scenarios with respective components
The production of Sky Team is really clean and well thought out, starting with the Control Panel itself. Adding double-sided stickers in the box to turn the game board from a single-layer to a double-layer surface, complete with IKEA-style directions, is absolutely brilliant and I wouldn’t be surprised if more games start taking note of this in the future. The wooden tokens really add a level of quality to the game as well despite their size, which I felt to be a tad bit small and finicky, especially for younger players. Everything else in the box though is just fantastic with the combination of simple iconography and bold, colorful art really taking this experience to the next level.

The biggest surprise for me was how much additional content they were able to include in the box for such a reasonable price! With 20 extra scenarios and endless module combos to try out, Sky Team is one of the most replayable two-player games I’ve ever come across and in my experience, every scenario feels uniquely different, presenting you with new challenges and puzzles to solve each time.
Overall, Sky Team is truly a triumph of cost-effective production and has set the gold standard for the level of content I expect to be included in future games at this price point and above. The game is robust and the art is striking—but the real question is: how does it play?
How to Play Sky Team
You can download a copy of the rulebook here.
The Goal
The goal of Sky Team is to safely land your aircraft and you’ll do so by accomplishing the following tasks by the final round:
- Clearing all Airplane Tokens from the Approach Track
- Activating all Switches on Flaps and Landing Gear
- Leveling your airplane’s axis to be completely horizontal
- Slowing your engines to be less than your Brakes value
If one or more of these tasks are incomplete when the final round ends, players lose the game. But if all the above tasks have been accomplished and both the Approach Track and the Altitude Track are on their final space (indicating the final round), then congratulations! The passengers erupt into a round of applause—you win!
Setup
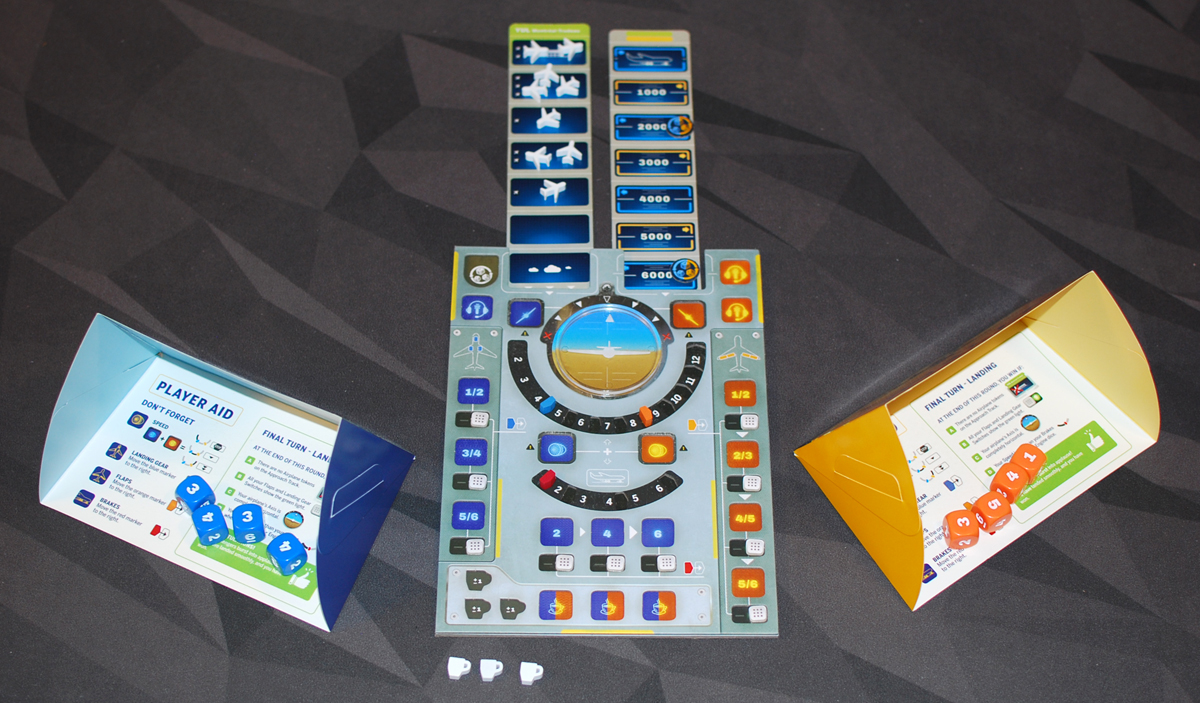
The setup for Sky Team is scenario-dependent so for the sake of this article, I’ll just describe the setup for the intro scenario, the approach towards the Montréal-Trudeau Airport. Assuming you’ve constructed the Control Panel according to the directions on the first page of the Landing Procedure booklet, place that Control Panel in the center of the table and add in the Airplane Axis Disc, making sure it’s level to start. Then, take the small blue, orange, and red markers and place them on their corresponding tracks, indicated by a dot of the same color.
Now it’s time to decide who’s playing pilot and who’s playing copilot. Each role has slightly different roles and responsibilities but mechanically they play the same, so don’t think too hard about it. Give the pilot their 4 blue dice, the copilot their 4 orange dice, and each player their corresponding Player Aid Screen. These screens will be used to both remind yourself of the details of the game but also to hide your rolled dice from your partner to maintain your limited communication.
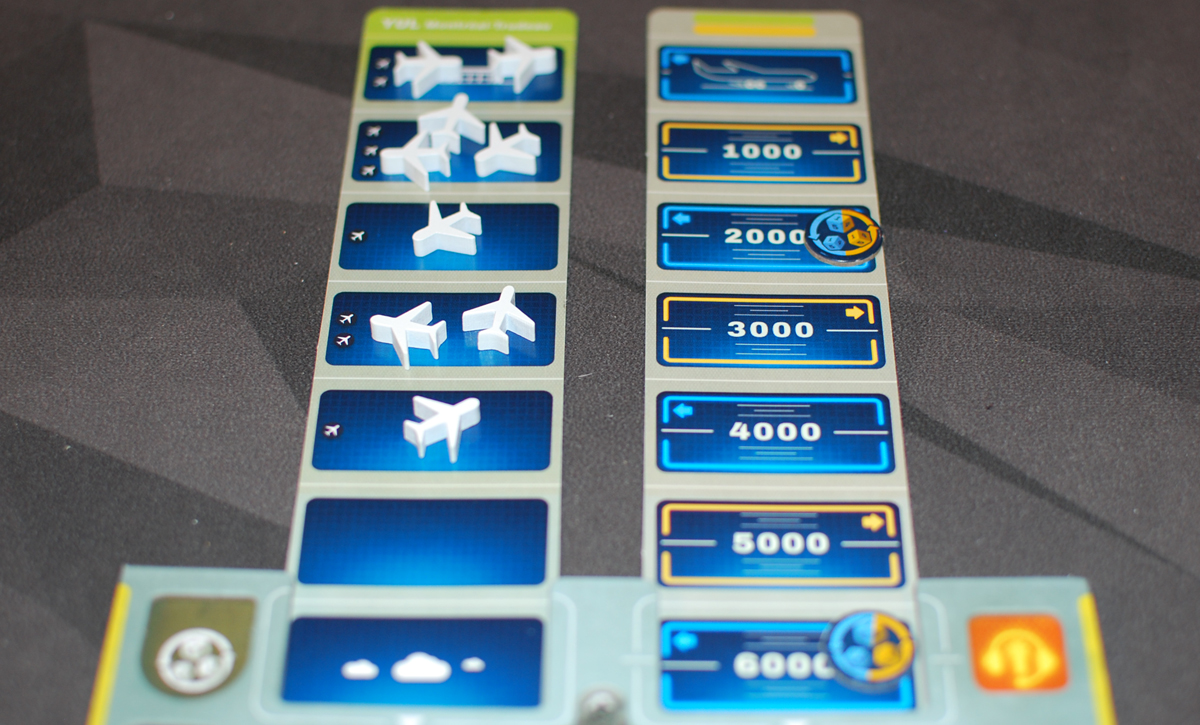
Next, slide the Altitude Track into the right slot on the top of the board so that the first box, labeled 6000, is still showing. Take Re-roll Tokens and place them on any altitudes that have a gray Re-roll symbol next to them. Then, slide the Approach Track into the left slot on the top of the board so that the space with the cloud icons is showing. On the left edge of the Approach Track, you’ll notice that there are a few small airplane icons. Place that number of wooden Airplane Tokens on those approach spaces—this represents airport traffic.
Take a moment now to reference your Player Aid Screen and evaluate the challenges of this particular scenario. Feel free to discuss strategy as much as you want during this phase as you won’t be able to communicate during the round itself. Once you feel ready, each player will take their dice and roll them behind their screens—now it’s time to land this sucker!
Gameplay
Sky Team is full of tension from the very start and a lot of that is due to the communication restrictions. Once players have rolled their four dice for the round, the rest of the round must be played without any sort of verbal correspondence, but there are still some very clever messages you can send to your partner based on the order in which you play your dice, which we’ll see later. But first: gameplay.
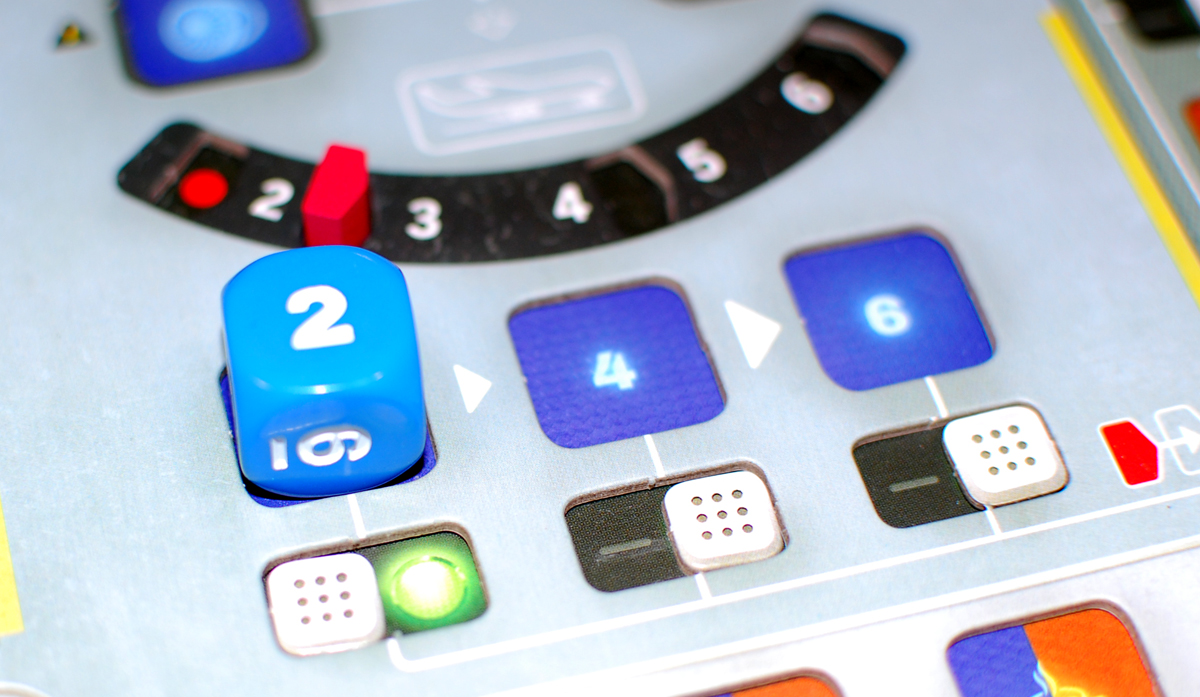
Play will begin with the player whose color is indicated on the current space on the Altitude Track—in the first round, it’s the pilot. The pilot will then take one of their blue die and place it on any legal location on the board. To be a legal location, it must contain the color of the current player and if there is a number value on that space, it must match the value of the die being placed. Once the pilot has chosen their placement, play will pass to the copilot who will place a die in the same way, but this time minding the orange spaces.
During the course of the round, there are two spaces that are mandatory for both players to place a die on: the Airplane Axis and the Engines. Each of these zones will be resolved immediately as soon as both players have placed their respective die, which can have a strategic impact on the game depending on the scenario you’re facing.
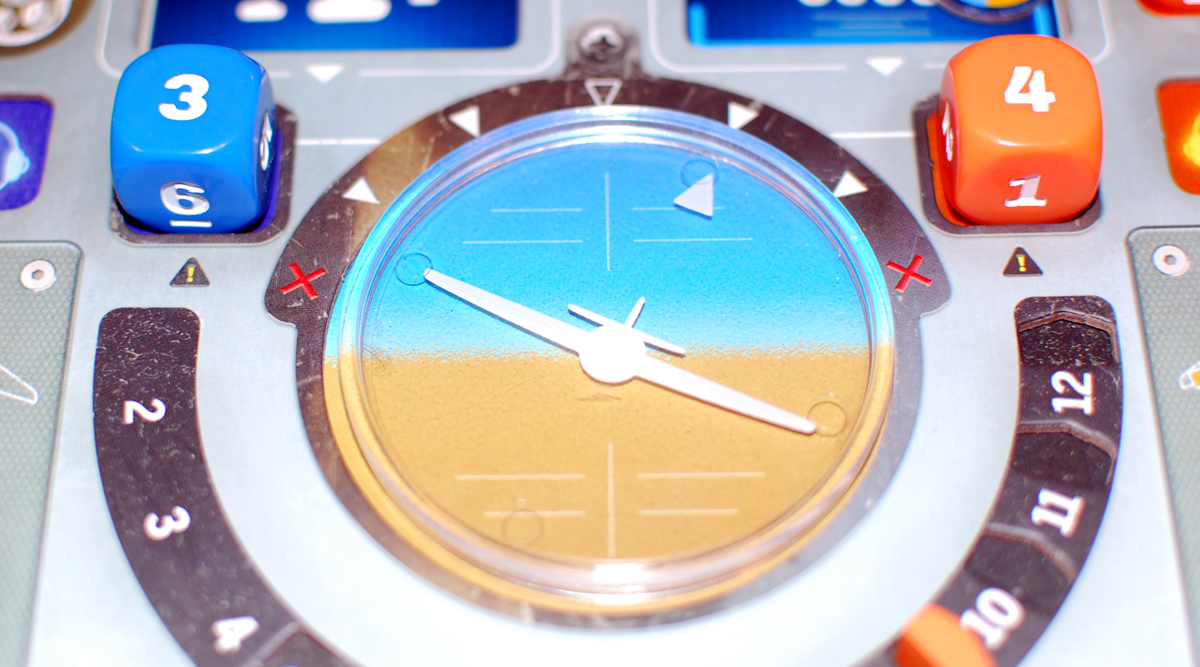
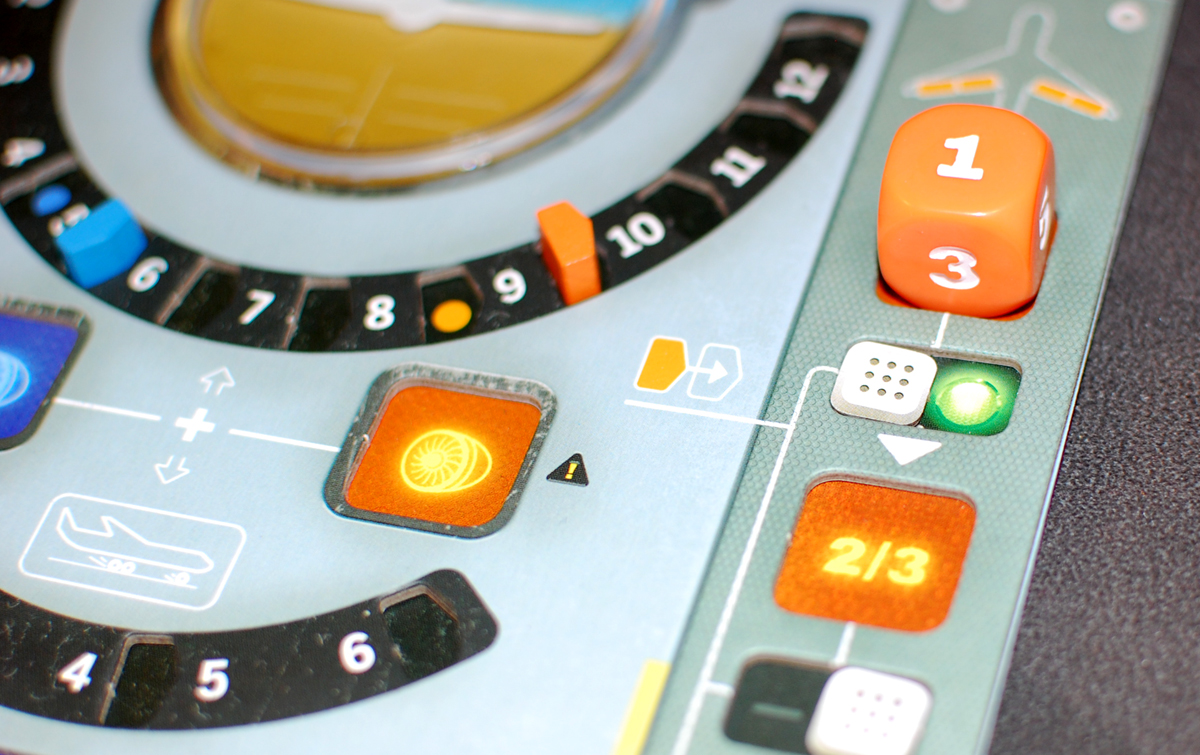
When both players have added a die to the Airplane Axis space, you’ll adjust the Airplane Axis Disc based on the difference in value between the two dice. For example, if the pilot placed a 4 and the copilot placed a 3, then the disc would shift over one tick to the pilot’s side. Even though this seems pretty straightforward and easy to manage, make sure you don’t forget about this zone—one or even two ticks to a side is safe, but if you’re ever forced to tilt it to the third tick, your plane will go into a spin and you’ll immediately lose, so be careful!
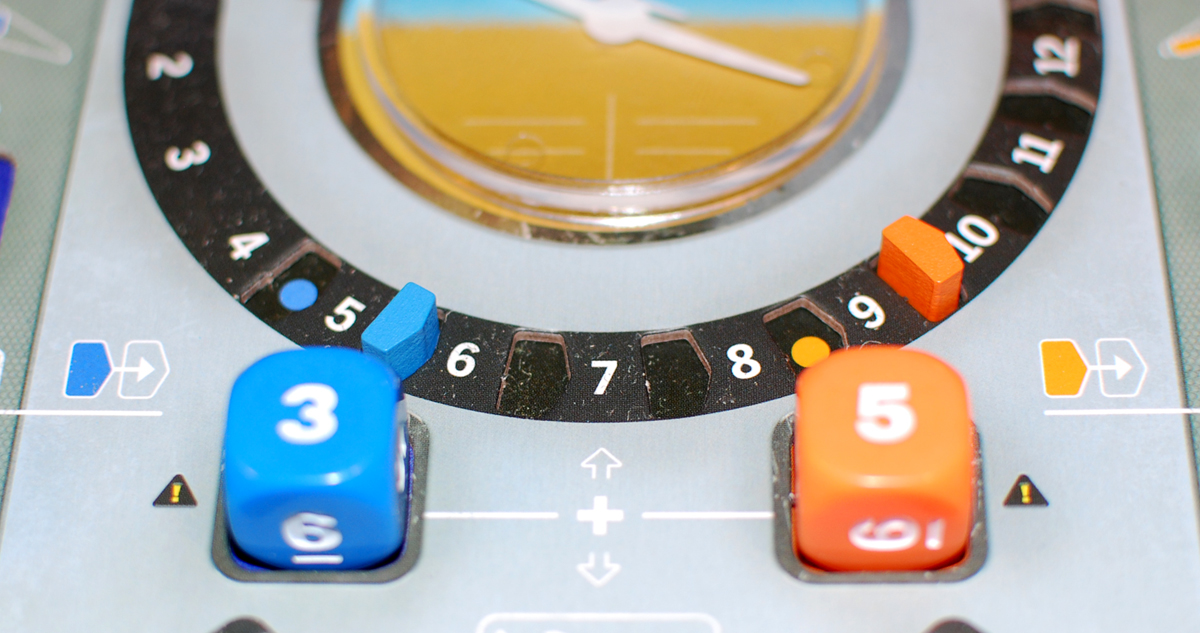
Now once the other mandatory zone, the Engines, has been activated, you’ll move the Approach Track accordingly. If the value of your combined Engine dice is lower than the blue marker on the Engines track, then you’ve stalled out and you won’t advance the Approach Track this round. If the values of your dice combine to be higher than the orange marker on the track, you’re coming in hot and you’ll have to advance the Approach Track an extra space. The best case scenario, though, is that your dice add up to somewhere between the two markers—if this is the case, you’ll advance the Approach Track just one space as you’re now going the appropriate speed.
You may notice that these speed threshold markers are movable as well. These blue and orange markers will move up on the Engines track by one spot for each die you place on a corresponding Landing Gear or Flaps space respectively. This means that throughout the game, you’ll have to keep increasing your Engine die value to keep up with the extra drag the plane is creating—very thematic.
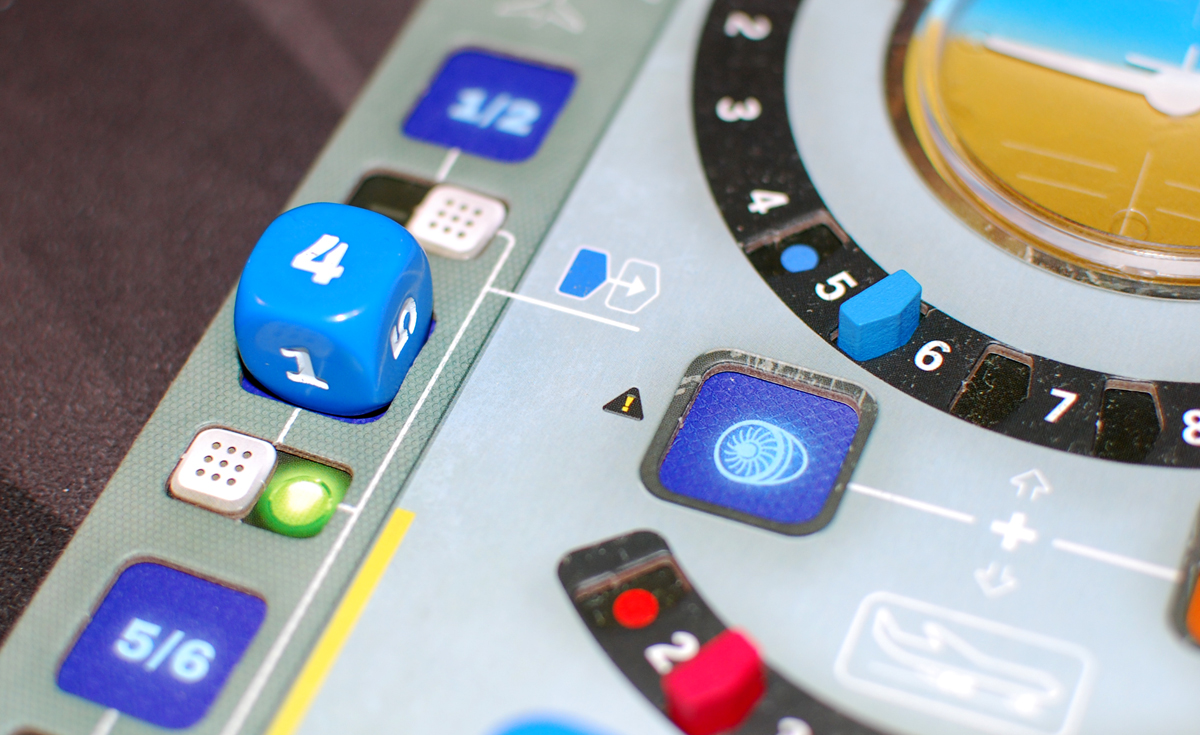
Other than the mandatory spaces and the Landing Gear and Flaps spaces that each have specific die values associated with them, there are three other locations that players can assign dice to. First off, the pilot has three extra blue spaces for the brakes. Any spaces past the first one of these are not mandatory to activate but the more switches you can flip, the easier it will be to land the plane in the final round, which we’ll talk about in a bit. When the pilot places a die in one of these spaces, the values of which have to be in numerical order, they’ll also move the red marker forward one space on the Brakes track to indicate the new speed threshold that the Engines need to be under in the final round.
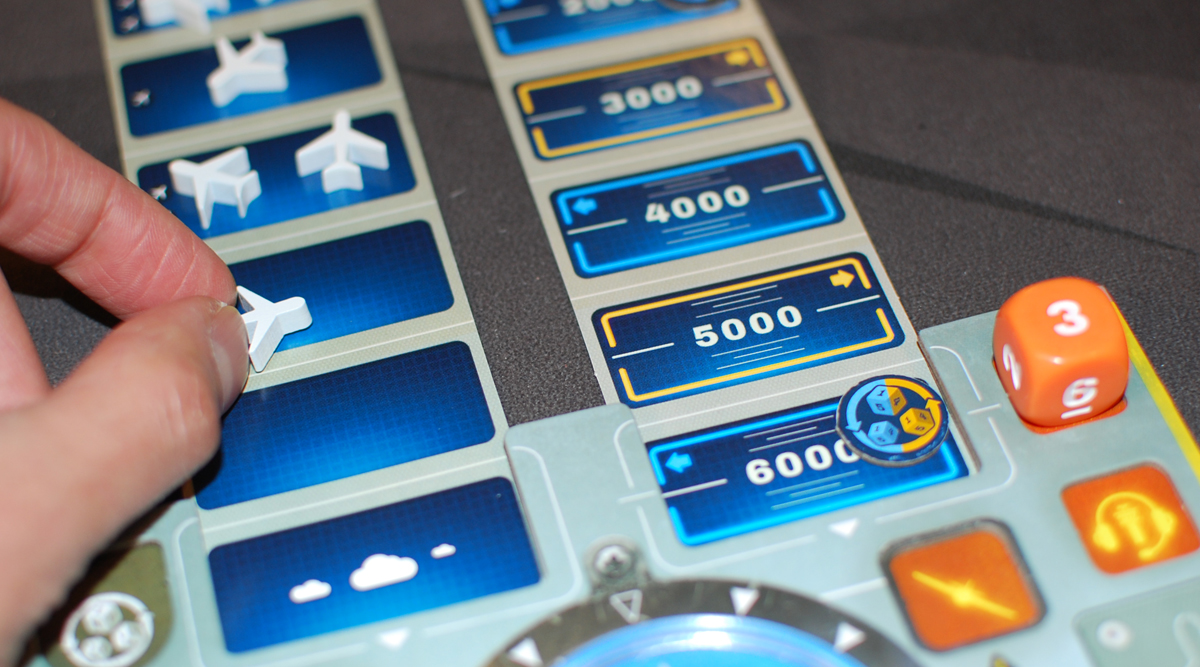
The next space is the Radio space, represented by the headset and the control tower icon. It can be activated by both the pilot and the copilot, although the copilot has an extra Radio space, which means this duty is more of their specialty. On Radio spaces, the die value really matters because whatever you place will determine the space on the Approach Track from which you can clear planes with this action. And because you need to clear all the planes from the runway before you can land safely, you’ll need both timing and precision to use these spaces to their fullest potential. It should also be noted that if you ever were to advance the Approach Track and you hadn’t cleared all the planes from the incoming space, you would cause a collision and instantly lose, so don’t do that!
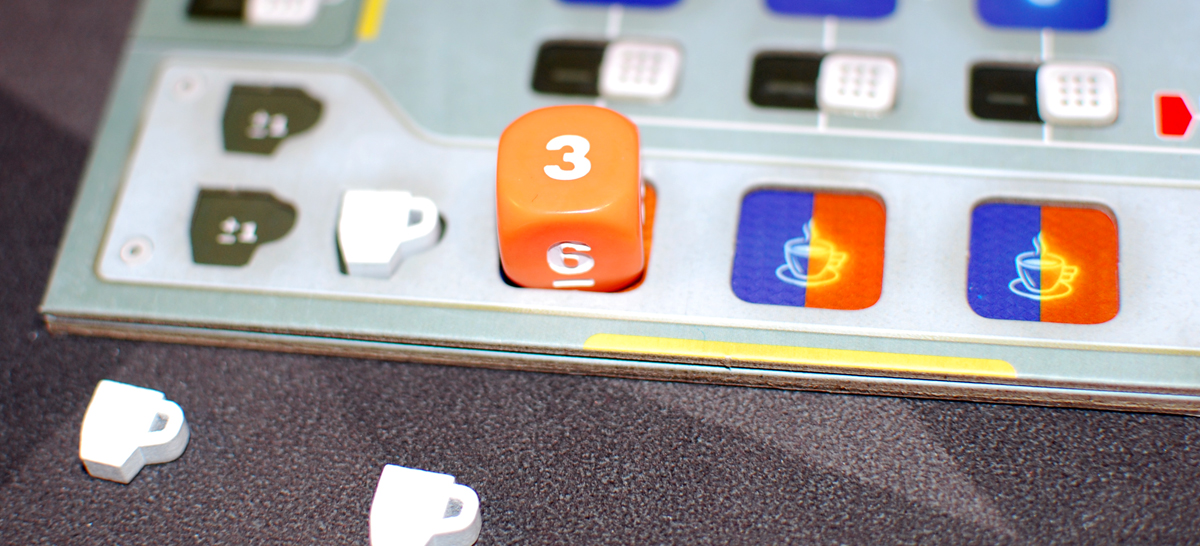
Now if you’re worried about being able to roll the exact numbers you need to complete your tasks, don’t worry—that’s what coffee’s for! The final spaces you can place a die on are the Concentration spaces. You can place a die of any value or any color on these spaces and receive one Coffee Token, which will allow you or your partner to change the value of a die by one later on down the road. Even though it costs an action, getting coffee is a super valuable part of this game and will give you some much-needed flexibility when you get to the final landing procedures, so make sure to stock up on it regularly!
Also, when you reach an altitude with a Re-Roll Token on it (for Montréal, you’ll get your first one on the first round), you claim it and put it in its slot in the console. Either player may spend a token, which allows both players to re-roll any number of their remaining dice one time. Sometimes the coffee just isn’t enough to bump the numbers you have—but be careful! You might not like your new numbers any better.
Play will continue back and forth until both players have placed all four of their dice, at which point the round ends, all dice are removed from the board and placed behind their respective screens, and the Altitude Track advances by one space. If there are still numbers showing on the current space on the Altitude Track, then you’ll continue playing more rounds, paying attention to the different start players indicated by the color on the current Altitude space. But if you’ve managed to advance to the final airplane space, ideally in the same round as you’ve advanced to the final airport space on the Approach Track, then you’ve triggered the final round. Either way, it’s a great time to start strategizing with your partner about everything you still need to accomplish!
Game End
If your Approach and Altitude Tracks show an airport and an airplane respectively, it’s time to get this plane on the ground! You’ll strategize and then roll your dice behind your screen as before, but there are a few extra things you need to pay attention to in order to ensure a safe landing. First off, you’ll need to make sure the combined value of your Engine dice is below your Brakes threshold, or else you’ll overshoot the runway and crash! Luckily, since you each have four dice, the pilot may be able to activate another Brake space this round to make it a little easier for everyone.
In addition to the engines, you’ll need to check a few more things off the list. You’ll need to make sure there are no more planes on the runway, you’ll need to make sure your Airplane Axis Disc is centered, and most importantly, you’ll need to make sure that all of the Flaps and Landing Gear have been deployed.
If any of those conditions are not met by the end of the round, then I’m afraid you may not be getting your pilot’s license back any time soon… But if you can manage to check all four of these boxes and get the plane there in one piece, then congrats, you win and you and your partner will live to fly another day!
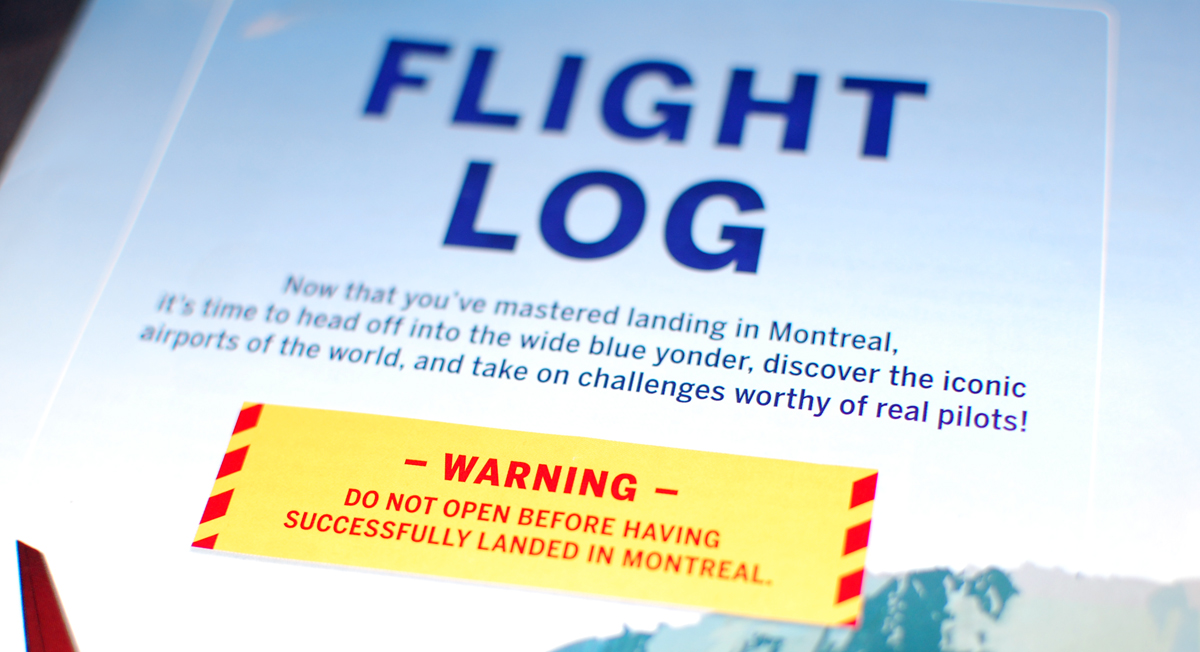
Advanced Scenarios
Once you’ve managed to land your plane at Montréal—congrats, by the way!—you can open up the Flight Log to start playing the advanced scenarios. To avoid spoilers, we won’t show you all the details, but things get more complicated. There are many more airports, each with its own idiosyncrasies. On top of that, you might find yourself running out of fuel… or even time!
Sky Team is GeekDad Approved!
Why You Should Play Sky Team
There’s a reason why Sky Team was one of the hottest releases at this year’s Gen Con, and I have to say, to me, it’s lived up to every bit of the hype. It’s not often that I get a chance to review a game that has the potential to change the landscape of the board game industry at large, but in my opinion, Sky Team could do just that.
First, let’s start with the overarching stuff. Sky Team falls into both the two-player and the cooperative genre, both categories which I think have been underrepresented in the board game industry up until this point, but also which have the potential to grow into new markets as more and more pandemic gamers look to expand their collections. As someone who has a very non-combative board gaming spouse, I am always on the lookout for two-player games that can present that tension and that problem-solving without requiring us to duke it out against one another and Sky Team does all of this and more.
From a mechanics standpoint, I love how simple everything is. Each of the dice placement zones is really straightforward but it’s your interaction with them and the non-verbal communication you make with each die that really makes this game sing. There’s so much you can communicate without talking in this game, and I think one of the most fun challenges in the game is figuring out how to show your hand to your partner in the most effective way. Maybe you throw an early Airplane Axis die out there to give them time to match your value? Or maybe you hold onto your Radio die till the very end so that you can clear off a plane once the Approach Track has advanced? Either way, there’s so much to be said without saying a word and the more you play it, especially with the same person, the more locked into each other’s actions you can become.
I’d also like to give a shoutout to the theming of this game. It’s one thing to come up with a compelling theme for a game, but when each of the actions feels so intuitive based on their real-life counterparts, it makes for an easy teach and a robust appreciation for the game over many plays. I mean, of course, the plane’s axis needs to be flat to land. And, of course, the speed of the plane needs to be less than the power of the brakes in order to stop. It all just makes sense. Even though I’ve never flown a plane myself, or even tried my hand at a flight simulator, I feel like I’ve been through all the ups and downs of that experience now, especially having played one of the harder scenarios.
And I haven’t even mentioned the 20(!) different scenarios included in the box that range anywhere from Easy to Heroic and take you to airports all around the world! What new challenges will you face next? Will you have to fight off the wind and brave an icy runway in Keflavík? Or perhaps you’ll be training a new intern on the way into Heathrow? Any way you swing it, the possibilities in this game seem almost as endless as Le Scorpion Masqué’s last hit game Turing Machine, and that’s saying something!
Anyways, this is usually the part of the review where I mention the things about a game that might make you temper your expectations but with Sky Team, even your highest expectations are likely to be shattered. Every scenario I’ve played and every module I’ve introduced has given each playthrough its own unique flavor, a perfect blend of tension and strategy that makes a task that seems insurmountable at first, turn into a roaring triumph in the end.
For me, Sky Team has become the blueprint that all other two-player cooperative games should be measured against. I can only hope that due to its commercial success, we’ll start seeing more games like Sky Team out there on the market—the board game industry will only be better for it. So if you’re looking for the perfect holiday gift for your number one gaming partner, or you’re just looking for a robust and thematic two-player experience with simple and intuitive mechanics and endless replayability, then might I suggest Sky Team?
For more information about Sky Team, visit Hachette Board Games’ website.
Click here to see all our tabletop game reviews.
![]() To subscribe to GeekDad’s tabletop gaming coverage, please copy this link and add it to your RSS reader.
To subscribe to GeekDad’s tabletop gaming coverage, please copy this link and add it to your RSS reader.
Disclosure: GeekDad received a copy of this game for review purposes.